Printing | 04 04 2022
Crafting а Schleicher K7 Glider using 3d printing
Detailed step by step tutorial for handcrafting Schleicher K7 Glider using 3d printing, written and demonstrated by our friend Dape. Follow him on facebook and twitter for more sweet tips and tricks.

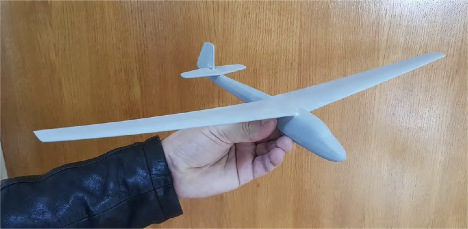
German Schleicher K7 glider is one of the most popular two-seat trainer gliders in the world of aviation, so we decided to pay homage to it by printing 1:33 3D model with all exact details. We will explain the whole process which was quite complicated and took many working hours, but the final result was very satisfying.

Step 1
Three basic parts are printed: body and two wings. The print itself was rough, so it requested cleaning and cutting with an eraser blade in order to remove support filament. It is a good idea to wear thick gloves to protect yourself from cutting.

Step 2
Next step is sanding. There will be a lot of sanding here, so arm yourself with a lot of patience! 400 sand paper and nail sander were used to get surface smooth. Once that part is done, body filler (used in automotive industry) was applied to cover all spots which had small holes and uneven surfaces. This process has to be repeated several times until all holes are filled and all surfaces are flat, because we will use fine body filler (spray gun). The better you prepare it - the easier to sand it. Every single time we apply body filler, we have to leave it for a while (24 hours) to get dry before sanding. In this case, we had to repeat this step 5 times.

Step 3
OK, this is the tricky part: wings have to be attached to the body, so we had to find the way how to do it. After several possible options, we decided to drill both wings and insert 3 nails in it and glue it with epoxy resin. We also have to drill 3 holes in the body, of course, and use epoxy resin to assure that connection is really strong.

Step 4
Wings are finally connected to the body and epoxy resin is dry. We can apply several layers of fine body filler now (spray gun). We will also check other parts and add more filler if needed. The connection between the body and the wings has to be covered well, because we do not want it to be visible, every- thing has to be perfect to look like it is made as one single part. We will also use one trick which is used in automotive field: the whole model will be covered with coal powder or black paint and we will sand it down. In that case, sanding paper will remove the black surface and everything will be light gray, again. All remaining black spots are the ones which are not even with the rest of it and more filler will be applied on those spots until everything is perfect.

Step 5
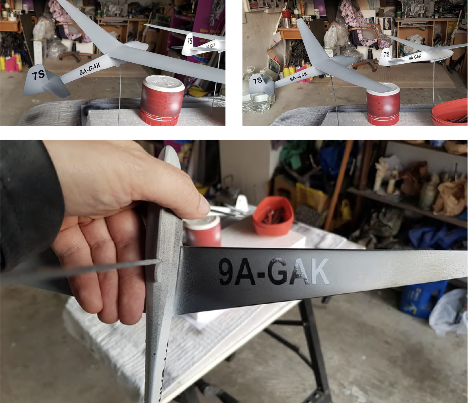
And here we go: the glider is ready to be painted. Filler is dry, all surfaces are perfectly smooth, all details are checked and it is time to make the plan how to paint it (painting steps). We also located test pieces of signs to see what size of letters and numbers we will use.

Step 6
As we mentioned earlier, it is very important to make a plan - steps of painting procedure itself. Some signs will be black, some will be white, so what to paint first before adding stickers with letters and numbers? Under the wing, sign is black. Signs on body are white. Only those small parts of glider will be painted in black and white and then we will add sticker signs on top of it. Later on, those stickers will be removed and original underpaint will appear. This is the best way to achieve clean shape of letters and numbers or some logos, whatever you need for your project. Make sure that stickers which you use, do not have strong glue, otherwise it could remove the paint under it and cause damage which can be very difficult to fix later on.
Step 7
After applying all stickers on already sprayed surface, it is time to spray another paint on top of it. We suggest spraying several thin layers, because thick layers of paint could damage stickers, but also it can get under stickers and leave marks. First color will be white, but only for wings.

Step 8
Once we are done with white, it is time to mask both wings by using 3M thin elastic tape in order to pro- tect it, because next color is red (for the body only). Make sure that tape is glued well, because another layer of paint could get under it.

Step 9
Next paint is chrome paint. Same procedure: masking all parts and leaving only cabin and skid visible. Make sure you do not have any opened spots. Also, considering the model is small and very fragile, we suggest to put an old blanket on floor or desk, just in case if you drop it. Lesson learned.

Step 10
OK, all done! Check everything very well before removing signs/stickers just in case if you need to correct some parts. If everything in order, all stickers can be removed (small sharp eraser); be very careful here, because you could scratch paint under stickers. The glider looks great and it is ready to be clear coated now.

Step 11
Four coats of high gloss clear coat are applied. Wait 30 minutes between each coat of clear coat before applying the next one. Colors looks much brighter now, your work is protected and all that high gloss will add magical touch to your project. Special stainless steel base and holder are made for our glider to keep it safe. We hope you enjoyed our tutorial and found some information and tips useful your future proj- ects. Safe flight!


Happy creating!
Related blog posts

printing | 16 Feb 2023
3D Printing as an Easy Way to Maintain My Classic Cars Collection
Short Text

printing | 01 Feb 2023
Jean M.S. - 3D Modeling Expert & RC Enthusiast
Short Text